Tuesday, June 23, 2009

Convert Computer Power Supply to use for CB / Ham radio

Got a old computer or power supply laying around?
Put it to good use, by converting it to a 12 volt supply for a CB or small ham radio.

1st of all, most power supplies cant just be wired to work for 12 volts, the right way.
Im using an older power supply, not sure what the type is (sorry) but it used a push button hard on/off switch on the computer.

**Make sure the power cord is disconnected**
Take the power supply apart.
I removed the old push button on/off switch and re-wired it to a SPST 6a/125v toggle switch.
I drilled it into the case, above the power cord location. This allows me to have a self contained switch, instead of one hanging on a cord.


Yellow wires are going to be you +12volt.
Black wired are Neg.
Red wires are +5 volt.
White wire is -5volt
Blue wire is -12 volt.

Remove the Blue, White and all but 1 red wire. Just cut them as close to the pins as possible.
You will need 1 red wire.
You will also need a 10 ohm, 10 watt resistor, available from Radio shack.
This will need to be wired and soldered inline with a Black Negative wire, to put a load on the +5volt circuit. Without this, your power supply wont produce the correct voltage.

Without a load on the +5volt circuit, I tested 10.2 volts on the 12volt wires. After adding the load resistor, I got 12.1 volts.
You will need to secure the resistor to a heat sink or to the case, with zip ties, because this will need some metal to cool it, as it will get hot. You can put it near the fan too, to keep it cooler.


I also found the voltage regulator VR pot, and I adjusted it to the max, which gave me 12.5volts, which makes it even better for 12 volt equipment.


Now all you need to do is limit the amount of +12voltwires and Negitivewires that you will need, as there are probably more than you will ever need. I cust all but 4 of each.

Now put the power supply back together, and thats it!
Now I have a 12 volt, 7 amp power supply for under $5 in parts.

Labels: , , ,

Tuesday, June 9, 2009

Cobra 25, 29 Uniden PC 66, 68, 78 Talkback Mod

This is a easy $1 mod to add talkback to your CB Radio.
This will work for the following radios with no problems.

Cobra 25
Cobra29
Uniden 66
Uniden 68
Uniden 76
Uniden 78
and many more.

All you need is a simple resistor added to the bottom of the board, near the Ext and Pa speaker jacks.

Find the 2 solder points, closest to the rear of the radio, directly above the EXT and Pa jacks.
These are going to be the Negative or Ground side for the audio.

Solder a 1/4 or 1/2 watt resistor between these two solder points. Make sure that the resistor itself does not short out anything on the board or touch anything else. You can wrap it in tape, heat shrink or just keep it lifted slightly above the board.


Use a 100-500 ohm resistor.
The Lower the resistance is, the Louder it will be.
A 100 ohm will be Louder than a 470 ohm.
I like to use a 220 for most mics, or a 470 for good power mics.
You can also wire up a 1K variable pot to adjust the volume level.
You can also use a switch to turn it on/off, just wire it in series.
Ive used the Norm/Ch9/Ch19 switch as a Off/Low/Hi with 2 resistors, to make it adjustable for different mics or volume levels.


Thats it! Just 2 solder points for basic talkback.

Labels: , , , , , ,

Monday, June 8, 2009

CB Mic Connector Problem

If you have ever had a CB mic that randomly cuts out on the Receive, Transmit or Audio, even when you have checked the wiring in the plug and it seems fine, then this is the EASY fix for most radios.

Most radios, including Cobra, Uniden, Galaxy and more use a connector that can fail easily, but its a simple 30 second FREE fix.
This is only for 4 pin microphone connectors, as the 5 and 6 pin are built different.

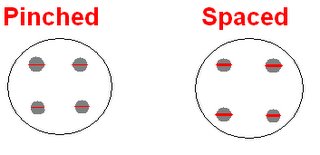
If you look closely at the male pins on the radio's connector, you will notice that they are split down the center. I have found over the years that these pins tend to get pinched together and flattened, when they should be slightly spaced apart, to create a good electrical connection.


Simply take a small flat head screwdriver and push it into the slots on the pins and spread them SLIGHTLY apart. Spread them less than 1mm. If you spread them too much, you can bend they way out of place and they may break when trying to bend it back.
This allows the MALE pins to fit better into the FEMALE holes in the mic's plug.

this should solve most problems, as long as the wires are soldered properly.
I have done this in over 50 radios over the years after other people have tried to re-wire mic plugs and swap out mics endlessly, when it was just a simple bad connection thats easily overlooked.

Labels: , , , , ,